Congratulations! You have finished your coursework for the Advanced Digital Pathways class. At this point you should have completed your portfolios and are now ready to burn DVDs of your work. Burning is super easy if you already have everything ready to go. Just follow the instructions below:
1. Log in on the Mac side of your computer (this is the only way to burn your Logic files)
2. Get a blank DVD from the instructor and pop it in.
3. A window should pop up asking you what program you want to open it up with. Choose Finder.
4. Now access the Media Share folder. (Ask the instructor if you don't remember how to do this.)
5. You should now have two windows open, one for the DVD and one for the Media Share. Simply drag and drop your portfolio into the DVD.
6. Hit the Burn button and let it burn, baby burn!!!
7. Eject your DVD and label it with a permanent marker.
8. Show it to friends, prospective employers, your grandma, whoever.
Wednesday, July 30, 2008
Monday, July 28, 2008
Student Evaluation: Setting up/troubleshooting in Pro Tools

Now that we're at the end of our class, I am supposed to be evaluating students in this class on what I think are the most important skills that you should have learned in my class. As your instructor, I believe that the single most important thing everyone should be able to do is to get a Pro Tools recording session up and ready for recording vocals.
Below are the steps of what I will be asking each individual student to demonstrate. Please review all these steps and make sure you are clear on all of them. If there is anything that doesn't make sense, please let me know and I will be happy to review it with you. Good Luck!
1. Select vocal and talkback microphones. Set up the vocal mic on the mic stand.
2. Plug cables and headphones into inputs on the Digi 003.
3. Create a new Pro Tools session in a designated folder.
4. Create new audio tracks and label accordingly.
5. Set good mic levels.
6. Adjust headphone levels.
7. Record a short vocal segment.
8. Save and close Pro Tools session.
9. Transfer the session folder to the Media Share folder.
Monday, July 21, 2008
{Logic Express: remix exercise}
Working with the Logic sessions you just created, we are now going to remix each other's work.
Please do the following:
1. Save your current project.
2. Click on the Mixer tab in the Editing Area of the project.
3. Pull down all the faders.
4. Now move over to the seat of the person on your right.
5. IMPORTANT: Before you do anything else, in that person's Logic session do a SAVE AS. Call the project "Logic loops remix"
6. Now start pulling up the faders and check out what the other person has done with this song.
7. Go crazy and remix this any way you want. Move regions around, rearrange stuff, whatever you want. But please do the following:
- Pan everything at least a little bit except the Drums and Bass. Try to get some call and response going on.
- Insert FX plugins on the different tracks. You are already familiar with Reverb and Delay. Some other interesting ones can be found under Distortion, Filtering, and Modulation.
NOTE: Don't add any new loops of your own. Try to just switch up the material the other person gave you.
Don't forget to save when you are done.
{Logic Express: Apple Loops exercise}
Today we're going to make a basic song and get familiar with working in Logic Express.
1. Launch Logic Express.
2. Create an Empty Project.
3. Create a Software Instrument Track.
4. Click on the Loops tab in the Media window.
5. Find at least 6 loops that you can create a song with and drag them into your Arrange window to work with them.
Create a song at least 32 bars long, show examples of looping and resizing regions. Let the instructor know when you are finished.
Intro to Logic

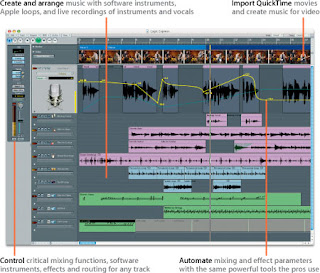
Today we are going to check out another DAW software called Logic Express. Logic Express is a "limited functionality" version of Logic Pro, Apple's own DAW software platform. For the most part, they look and perform the same. The main differences are that Logic Ex. can't do surround sound, can't handle certain professional software/hardware applications, and doesn't have as many plugin instruments. Everything else is pretty similar.
Right now, let's just get familiar with the main sections of the screen:
- The Arrange Area
- the Editing Area
- the Toolbar
- the Inspector
- the Transport Bar
- the Media or Lists Area
Just like Pro Tools, in Logic you are basically just working with regions on tracks. And, as in PT, there are a number of ways that you are able to edit these regions. Here are some basic navigation/editing techniques:
- Drag a region to move it.
- Option-drag a region to copy it.
- Place the mouse pointer at the end of the lower corner of a region to resize it.
- Place the mouse pointer at the end of the upper corner of a region to loop it.
Today we're going to use these techniques to put together a basic song using Apple loops.
Wednesday, July 9, 2008
{Aux Exercise 2 - Subgroups}
1. Launch Pro Tools and open one of your most complete songs.
2. Create a new Stereo Aux track.
3. Make the input of the track Bus 1-2.
4. Decide what tracks you want to group together (I recommend either vocals or drums) and label your Aux track appropriately. Example: "Vocal Aux"
5. Change the Outputs of all the tracks you want grouped to be Bus 1-2.
6. Do any necessary adjustments to make those tracks sound balanced relative to one another.
7. Now Insert a compressor onto the Aux track and adjust the settings to make it sound good. Hint: you can use the preset settings as a starting point.
8. Create a second Aux track to use for FX. Remember, in order to get sounds to the Aux track, use the Aux Send section of the track, NOT the Output.
Tuesday, July 8, 2008
{Audio Post exercise - part 1}

Today we're going to practice importing a Quicktime movie into Pro Tools and then add some effects and ambience to bring the clip to life.
The whole key here is to make the sounds happen in sync with the actions in the video. To do this, you will probably need to do a lot of zooming in order to get precise. Remember, the quick keys for zooming in/out are Ctrl [/].
1. First, find the Video Files folder on the Media Share folder and copy it to your own hard drive:
Media Share>Class Materials>Video Files.
2. Now check out all the different video clips in the folder and pick one that you want to work with.
3. Create a new PT session in your folder on your hard drive.
Name it: (your name)_Audio Post exercise.
4. Now import the Quicktime movie - it's the same process as importing audio (File>Import>Video).
5. Place at least 10 different sound FX in your project, including at least 1 track of ambience. You can get sounds either from the Hollywood Edge sound FX library, or by recording your own sounds directly into Pro Tools. Whichever way you choose to go, please LABEL every single track according to what the sound is.
6. Save the session and show the instructor.
Note: you will be doing more work with this session, so be sure you know where the PT session folder is saved and you can find it again.
The Elements of Audio Post Production

Audio post-production refers to all the work that is done on a movie's sound after the shooting has finished. The sounds that go into a video or film can be broken down into 4 basic categories:
1. Dialog - the MOST important part of the soundtrack. Includes anything being said by characters on or off screen. In many cases, the dialog you hear in a movie is actually NOT what was recorded at the time of filming; it is rerecorded in a studio by the actors who say their lines while watching the video of their performances. This is called ADR (Automatic Dialog Replacement).
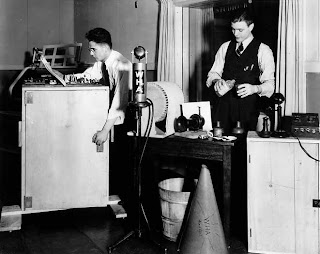
2. Foley sounds - sounds made by the characters as they move around in the scene (footsteps, clothing rustling, picking things up, etc.). These sounds are performed by foley artists who specialize in making sounds that realistically match the actions on the screen (even though the sounds may actually be made using all kinds of crazy materials).
3. Sound effects - sounds not made by the characters. These can include realistic sounds (cars, animals, everyday things), ambience, bigger-than-life sounds (explosions), and imaginary sounds (lightsabers).
4. Music - there are four main types of music you might hear in a video
- Score - Music composed specifically for a film or video
- Jingle - Music composed for a commercial
- Environmental music - music that is actually part of the background of a scene (from a radio, playing in a bar, etc.)
- Soundtrack music - any music where the music is the main audio focus (a music video, the end credits of a movie)
Monday, July 7, 2008
{Aux Track exercise)
Using the PT session we created in class with Bedrock, let's learn how to put a Reverb plugin on an Aux track and send the main vocals to it.
1)Copy the PT session folder to your hard drive. Open the session file called "bedrock_nicolle_exercise.ptf".
2) Listen to the song as it is. Try adjusting the volume levels of the tracks:
- Yarrow Aux
- tino aux
3) Create a new Stereo Aux track. Name it "Verb".
4) Set the input of the track to Bus 5-6.
5) Insert a D-verb plugin on the track (Reverb>D-verb)
6) Set the Aux Sends to Bus 5-6 on the following tracks:
- yarow.02
- tino
7) Raise the Send Levels to give the right amount of reverb to the two main vocal tracks (Yarrow's and Tino's).
8) Try changing the settings of the reverb plugin to give the tracks different feels.
9) Save the session and show the instructor.
Now try applying this concept and add some reverb (or other FX) to your own song.
Wednesday, July 2, 2008
{PT Mixing Tutorial}

Today we're going to be working on a basic mixing tutorial that is available online. This exercise will walk you through using two types of processors on your tracks: a compressor and an equalizer (aka EQ).
Before you can get going with this exercise, though, you will need to copy the Pro Tools session folder to your hard drive. I have put this on the Media Share folder for you. Please drag the following folder to your hard drive:
Media Share>Class Materials>Mixing Lesson (PT 5-6.9)
When you've got the folder copied, please go to this website:
http://homerecording.about.com/od/mixingyourmusic/ss/mixinglesson.htm
This is the first page of a 6 part lesson. As you finish each part, just click on the Next button at the bottom of the page. These are very simple instructions that are just designed to give you a basic understanding of what is involved with mixing a song.
FYI, this is not what I would consider "good" music. But that's not really the point. Mixing engineers spend a very large amount of time working on music that they wouldn't normally choose to listen to. What is important is that you begin to develop skills that you can apply to any mixing situation, including but not limited to your own music.
Here are some things you should be aware of on a couple of the pages:
- Page 1 - I've already given you the PT Session, so don't worry about downloading it.
- Page 3 - There is no compressor preset called "Basic Snare". Use the one called "Snare Comp" instead.
- Page 4 - When it says you should work with the "low end", use the section of the EQ called LF (the red one). When it says to work with the "High mids", use the section called HMF (the green one).
- Page 5 - When it tells you to add a "tiny bit of mid range", which section do you think you should use?
- Page 6 - You don't need to bounce the song out of PT (just show your work to Chris or Corina), but you DO need to try compressing at least one of the other tracks they suggest (acoustic guitar, keyboards, electric guitar).
When you finish, save this (you don't have to rename the session) and have one of the instructors check it out. Then, go on to the next Tutorial about mixing drums...
First, copy the following Pro Tools session file to your computer:
MediaShare>Class Materials>Mixing Drums Session
http://homerecording.about.com/od/protoolstutorials/ss/drums_pro_tools.htm
Subscribe to:
Comments (Atom)
