Congratulations! You have finished your coursework for the Advanced Digital Pathways class. At this point you should have completed your portfolios and are now ready to burn DVDs of your work. Burning is super easy if you already have everything ready to go. Just follow the instructions below:
1. Log in on the Mac side of your computer (this is the only way to burn your Logic files)
2. Get a blank DVD from the instructor and pop it in.
3. A window should pop up asking you what program you want to open it up with. Choose Finder.
4. Now access the Media Share folder. (Ask the instructor if you don't remember how to do this.)
5. You should now have two windows open, one for the DVD and one for the Media Share. Simply drag and drop your portfolio into the DVD.
6. Hit the Burn button and let it burn, baby burn!!!
7. Eject your DVD and label it with a permanent marker.
8. Show it to friends, prospective employers, your grandma, whoever.
Wednesday, July 30, 2008
Monday, July 28, 2008
Student Evaluation: Setting up/troubleshooting in Pro Tools

Now that we're at the end of our class, I am supposed to be evaluating students in this class on what I think are the most important skills that you should have learned in my class. As your instructor, I believe that the single most important thing everyone should be able to do is to get a Pro Tools recording session up and ready for recording vocals.
Below are the steps of what I will be asking each individual student to demonstrate. Please review all these steps and make sure you are clear on all of them. If there is anything that doesn't make sense, please let me know and I will be happy to review it with you. Good Luck!
1. Select vocal and talkback microphones. Set up the vocal mic on the mic stand.
2. Plug cables and headphones into inputs on the Digi 003.
3. Create a new Pro Tools session in a designated folder.
4. Create new audio tracks and label accordingly.
5. Set good mic levels.
6. Adjust headphone levels.
7. Record a short vocal segment.
8. Save and close Pro Tools session.
9. Transfer the session folder to the Media Share folder.
Monday, July 21, 2008
{Logic Express: remix exercise}
Working with the Logic sessions you just created, we are now going to remix each other's work.
Please do the following:
1. Save your current project.
2. Click on the Mixer tab in the Editing Area of the project.
3. Pull down all the faders.
4. Now move over to the seat of the person on your right.
5. IMPORTANT: Before you do anything else, in that person's Logic session do a SAVE AS. Call the project "Logic loops remix"
6. Now start pulling up the faders and check out what the other person has done with this song.
7. Go crazy and remix this any way you want. Move regions around, rearrange stuff, whatever you want. But please do the following:
- Pan everything at least a little bit except the Drums and Bass. Try to get some call and response going on.
- Insert FX plugins on the different tracks. You are already familiar with Reverb and Delay. Some other interesting ones can be found under Distortion, Filtering, and Modulation.
NOTE: Don't add any new loops of your own. Try to just switch up the material the other person gave you.
Don't forget to save when you are done.
{Logic Express: Apple Loops exercise}
Today we're going to make a basic song and get familiar with working in Logic Express.
1. Launch Logic Express.
2. Create an Empty Project.
3. Create a Software Instrument Track.
4. Click on the Loops tab in the Media window.
5. Find at least 6 loops that you can create a song with and drag them into your Arrange window to work with them.
Create a song at least 32 bars long, show examples of looping and resizing regions. Let the instructor know when you are finished.
Intro to Logic

Today we are going to check out another DAW software called Logic Express. Logic Express is a "limited functionality" version of Logic Pro, Apple's own DAW software platform. For the most part, they look and perform the same. The main differences are that Logic Ex. can't do surround sound, can't handle certain professional software/hardware applications, and doesn't have as many plugin instruments. Everything else is pretty similar.
Right now, let's just get familiar with the main sections of the screen:
- The Arrange Area
- the Editing Area
- the Toolbar
- the Inspector
- the Transport Bar
- the Media or Lists Area
Just like Pro Tools, in Logic you are basically just working with regions on tracks. And, as in PT, there are a number of ways that you are able to edit these regions. Here are some basic navigation/editing techniques:
- Drag a region to move it.
- Option-drag a region to copy it.
- Place the mouse pointer at the end of the lower corner of a region to resize it.
- Place the mouse pointer at the end of the upper corner of a region to loop it.
Today we're going to use these techniques to put together a basic song using Apple loops.
Wednesday, July 9, 2008
{Aux Exercise 2 - Subgroups}
1. Launch Pro Tools and open one of your most complete songs.
2. Create a new Stereo Aux track.
3. Make the input of the track Bus 1-2.
4. Decide what tracks you want to group together (I recommend either vocals or drums) and label your Aux track appropriately. Example: "Vocal Aux"
5. Change the Outputs of all the tracks you want grouped to be Bus 1-2.
6. Do any necessary adjustments to make those tracks sound balanced relative to one another.
7. Now Insert a compressor onto the Aux track and adjust the settings to make it sound good. Hint: you can use the preset settings as a starting point.
8. Create a second Aux track to use for FX. Remember, in order to get sounds to the Aux track, use the Aux Send section of the track, NOT the Output.
Tuesday, July 8, 2008
{Audio Post exercise - part 1}

Today we're going to practice importing a Quicktime movie into Pro Tools and then add some effects and ambience to bring the clip to life.
The whole key here is to make the sounds happen in sync with the actions in the video. To do this, you will probably need to do a lot of zooming in order to get precise. Remember, the quick keys for zooming in/out are Ctrl [/].
1. First, find the Video Files folder on the Media Share folder and copy it to your own hard drive:
Media Share>Class Materials>Video Files.
2. Now check out all the different video clips in the folder and pick one that you want to work with.
3. Create a new PT session in your folder on your hard drive.
Name it: (your name)_Audio Post exercise.
4. Now import the Quicktime movie - it's the same process as importing audio (File>Import>Video).
5. Place at least 10 different sound FX in your project, including at least 1 track of ambience. You can get sounds either from the Hollywood Edge sound FX library, or by recording your own sounds directly into Pro Tools. Whichever way you choose to go, please LABEL every single track according to what the sound is.
6. Save the session and show the instructor.
Note: you will be doing more work with this session, so be sure you know where the PT session folder is saved and you can find it again.
The Elements of Audio Post Production

Audio post-production refers to all the work that is done on a movie's sound after the shooting has finished. The sounds that go into a video or film can be broken down into 4 basic categories:
1. Dialog - the MOST important part of the soundtrack. Includes anything being said by characters on or off screen. In many cases, the dialog you hear in a movie is actually NOT what was recorded at the time of filming; it is rerecorded in a studio by the actors who say their lines while watching the video of their performances. This is called ADR (Automatic Dialog Replacement).
2. Foley sounds - sounds made by the characters as they move around in the scene (footsteps, clothing rustling, picking things up, etc.). These sounds are performed by foley artists who specialize in making sounds that realistically match the actions on the screen (even though the sounds may actually be made using all kinds of crazy materials).
3. Sound effects - sounds not made by the characters. These can include realistic sounds (cars, animals, everyday things), ambience, bigger-than-life sounds (explosions), and imaginary sounds (lightsabers).
4. Music - there are four main types of music you might hear in a video
- Score - Music composed specifically for a film or video
- Jingle - Music composed for a commercial
- Environmental music - music that is actually part of the background of a scene (from a radio, playing in a bar, etc.)
- Soundtrack music - any music where the music is the main audio focus (a music video, the end credits of a movie)
Monday, July 7, 2008
{Aux Track exercise)
Using the PT session we created in class with Bedrock, let's learn how to put a Reverb plugin on an Aux track and send the main vocals to it.
1)Copy the PT session folder to your hard drive. Open the session file called "bedrock_nicolle_exercise.ptf".
2) Listen to the song as it is. Try adjusting the volume levels of the tracks:
- Yarrow Aux
- tino aux
3) Create a new Stereo Aux track. Name it "Verb".
4) Set the input of the track to Bus 5-6.
5) Insert a D-verb plugin on the track (Reverb>D-verb)
6) Set the Aux Sends to Bus 5-6 on the following tracks:
- yarow.02
- tino
7) Raise the Send Levels to give the right amount of reverb to the two main vocal tracks (Yarrow's and Tino's).
8) Try changing the settings of the reverb plugin to give the tracks different feels.
9) Save the session and show the instructor.
Now try applying this concept and add some reverb (or other FX) to your own song.
Wednesday, July 2, 2008
{PT Mixing Tutorial}

Today we're going to be working on a basic mixing tutorial that is available online. This exercise will walk you through using two types of processors on your tracks: a compressor and an equalizer (aka EQ).
Before you can get going with this exercise, though, you will need to copy the Pro Tools session folder to your hard drive. I have put this on the Media Share folder for you. Please drag the following folder to your hard drive:
Media Share>Class Materials>Mixing Lesson (PT 5-6.9)
When you've got the folder copied, please go to this website:
http://homerecording.about.com/od/mixingyourmusic/ss/mixinglesson.htm
This is the first page of a 6 part lesson. As you finish each part, just click on the Next button at the bottom of the page. These are very simple instructions that are just designed to give you a basic understanding of what is involved with mixing a song.
FYI, this is not what I would consider "good" music. But that's not really the point. Mixing engineers spend a very large amount of time working on music that they wouldn't normally choose to listen to. What is important is that you begin to develop skills that you can apply to any mixing situation, including but not limited to your own music.
Here are some things you should be aware of on a couple of the pages:
- Page 1 - I've already given you the PT Session, so don't worry about downloading it.
- Page 3 - There is no compressor preset called "Basic Snare". Use the one called "Snare Comp" instead.
- Page 4 - When it says you should work with the "low end", use the section of the EQ called LF (the red one). When it says to work with the "High mids", use the section called HMF (the green one).
- Page 5 - When it tells you to add a "tiny bit of mid range", which section do you think you should use?
- Page 6 - You don't need to bounce the song out of PT (just show your work to Chris or Corina), but you DO need to try compressing at least one of the other tracks they suggest (acoustic guitar, keyboards, electric guitar).
When you finish, save this (you don't have to rename the session) and have one of the instructors check it out. Then, go on to the next Tutorial about mixing drums...
First, copy the following Pro Tools session file to your computer:
MediaShare>Class Materials>Mixing Drums Session
http://homerecording.about.com/od/protoolstutorials/ss/drums_pro_tools.htm
Tuesday, June 24, 2008
PT: Exporting (aka "Bouncing") out of Pro Tools

At some point, you may want to actually listen to a project that you have worked on in Pro Tools in some other format (CD/iTunes) or upload songs to a website. In order to do this, you need to export the song out of PT as a stereo audio file. The process for doing this in PT is called "Bouncing to Disk".
Here is a quick recipe for Bouncing:
- Make sure that all the appropriate tracks are set to play back (not Muted).
- Check that the area that you will be bouncing is just the length of the song - make sure that there are no stray regions floating around to the right of where the song ends. Pro Tools will automatically find the farthest right point of any region in the session and consider that the end point, so pay attention to where this is! (Hint: if your song is only supposed to be 2 minutes, and PT says it's going to take 15 minutes to bounce, you've probably got some stray region action going on.)
- If everything's cool, then go to File>Bounce to>Disk.
- The Bounce Options window will then pop up, where you can specify the details of the audio file you're exporting. For now, let's just use the following settings:
- Bounce Source: Out 1-2 (Stereo)
- File Type: WAV
- Format: Stereo Interleaved
- Resolution: 16
- Sample Rate: 44100
window.
6. Now a new window will pop, called Save Bounce As. Here you name the file and tell PT where you want to save it.
* Note: If you don't make any changes, PT will automatically save the new file in
the Audio Files folder of the Pro Tools session you are working with.
7. Hit the Save button and PT will start the Bouncing process. A window will pop up that says "Bouncing to Disk" with the Time Remaining counting down. When it is done, the window will automatically close.
8. Find the file on your hard drive.
Monday, June 23, 2008
{Street Interview Edits}

Now that we've recorded our Street Interviews and (hopefully) gotten a wide range of opinions on the subject your group came up with, it's time to start editing the audio down to a short segment that would be appropriate for the radio.
Here are some guidelines:
- No profanity - This doesn't mean you can't use segments that had profanity. It just means that you need to edit out the offensive words.
- Try to get the audio as clean as possible - Not talking about bad language here, we're talking about the quality of the audio. The best audio is well recorded to begin with (even volume levels, not a lot of background noise). But if you have audio with certain problems (e.g. wind noise), you should really try to work to clean it up in Pro Tools. Clean edits are key (crossfades!!!).
- Keep your sound bites short - Your audience doesn't necessarily want to hear every single word an interviewee said. Keep the interview moving by cutting between different people's responses. Don't let anyone go on for longer than 2-3 sentences max.
- Try to give the interview a certain flow - There are lots of ways you can do this. One way is to group similar responses together. Another would be to juxtapose really different responses. You can go in a lot of different creative directions with how you put this together; try to make it feel like it's not just a bunch of random sound bites all mashed together.
- Be ~ 2-3 minutes long.
- Have a music bed underneath it.
- Have a paragraph (text document) that explains:
- Who was in the group.
- What the interview topic was.
- What kinds of responses the group got to the questions.
- Whether these responses were consistent with what the group thought they would be.
An example would be: "Interview_Music 6-23-08"
Copies of the WAV file and text document should be distributed to each group member and to the instructor. Put both of these files in the Media Share folder (Media Share>Student Work>Street Interviews>Final).
Wednesday, June 18, 2008
PT: Getting Around using Modes
Last time we talked a little bit about the different Modes that Pro Tools lets you use to get around. We're already really familiar with Slip Mode, and in the last class we got introduced to Shuffle Mode. Today we're going to get quickly introduced to the remaining two Modes: Grid and Spot.
Please do the following:
1. Look on the Media Share drive and copy the folder called Rootsy to your hard drive.
(Media Share>Class Materials>Rootsy)
2. Open the Pro Tools session.
3. Take a minute to listen to the beat and get a feel for it. (It's just basic - 2 verses, 2 choruses).
So we're just going to be importing 2 little pieces of audio to enhance the song and we're going to use the two different modes to make it happen.
4. So let's make 2 new audio tracks to put them on. Please make them Stereo Audio tracks. Label the first one Spooky and the other one EPiano.
5. Now let's set the mode to Grid.
6. In order for the grid to line up with our song we now have to make sure the tempo of the session is set right. Click on the Red Triangle to open up the tempo dialog box.
Set the tempo to 98 BPMs. Notice how the blue lines are right on time with the Bars and Beats of the song.
Now let's find the audio that we want to bring into the song. The files are actually already in the session, we just have to find it in the Region Bin.
7. Click on the double arrows in the bottom right of the window to open the Region Bin.
8. Find the Region called Spooky Synth and drag it onto the track called Spooky.
9. Place it at Bar 9.
10. Now let's loop this four times. We can either do this by copying and pasting, or by going into the Region menu and clicking Duplicate. I want four loops of this region.
11. When you've got four loops, now I want you to copy and paste all four to a different part of the song. Paste them starting at Bar 33. Listen to the part and what come after it.
Now we're going to use Spot Mode to get the last part into the song.
12. Put Pro Tools into Spot Mode.
13. Make sure that only the track called EPiano is highlighted.
14. In the Region Bin, drag the region called EPiano into the session.
15. A dialog box will open up and ask you where you want it to go. Be sure to set the Time Scale is set to Bars and Beats. In the Start Section, enter 17.1.000. Pro Tools should drop it right at Bar 17.
16. Now make a copy of this and past it at Bar 41.
Listen back to the song and make sure everything is in time. Have the instructor check it and you're done.
Wednesday, June 11, 2008
{MLK Editing Assignment}

Today we're going to get into some advanced editing techniques. To practice these techniques, we're going to take an audio file from a famous speech (Martin Luther King Jr.'s "I've Been to the Mountaintop" speech) that has been chopped up and put out of order. Your assignment is to reassemble all the segments in the correct order.
First, let's listen to the speech...
http://www.americanrhetoric.com/speeches/mlkivebeentothemountaintop.htm
Now do the following:
1. Find the folder called "MLK_Mountaintop" on the Media Share folder and copy it into your Pro Tools Sessions folder on your computer.
2. Look in that folder and open the text document called "Mountaintop_text". You will be using this as reference for this assignment.
3. Open the Pro Tools session file called "MLK_Mountaintop.ptf". Play it back. What's going on with it?
So, obviously this is all out of order and messed up. Your assignment is to chop it all back up and put the segments in the correct order. To make this process quick, I want you to do two things:
- Instead of using the copy/paste technique that we used in the last exercise (assembling our interview edits), use the Separate Region command. Simply drop the cursor wherever you want to make the cut and hit Control-E.
- Put Pro Tools into Shuffle Mode to keep all the different regions stuck together. This will save you the effort of having to manually move them and will eliminate any dead space between the regions.
Also...
Please, please, PLEASE use crossfades between all your regions.
When you are finished, please show the instructor and then move on to the final step of this exercise: healing separations.
Heal Separation allows you to recombine a bunch of separate regions into one single region. Why would you want to do this? Mainly because it allows you to work with all this audio as a single thing, rather than a bunch of different little clips. This just makes it all easy to work with. Plus it just looks better.
To heal separation:
- Use the Selector Tool to highlight all the regions you want to include
- Go to Edit>Heal Separation (or hit Control-H)
Wednesday, May 28, 2008
{Interview Assignment}
"What is the single most important issue facing your generation?"
This is the question I have for you.
Whatever your answer is, I want you to explore the issue by getting some opinions from your classmates. To do this, I want you to do the following:
- Think about the question.
- Come up with 5-10 questions of your own that explore the issue.
- Interview 5 of your classmates and have them answer your questions. Record the interviews in Pro Tools. Call the session "Class Interviews_(your name)".
- Once you have all the interviews recorded, create a new track called "Final"
- Edit together all the best parts of the 5 interviews. Get creative and put them together in a way that makes sense to the listener.
- Turn in a copy of the Pro Tools session and a text document with your questions.
- Each interviewee recorded on a separate track.
- Each track labeled with the the interviewees' names.
- Good levels (no clipping!).
Please call this file "Class Interview Questions_(your name)".
Please put a copy of both the Pro Tools session and the text document on the Media Share folder in Media Share>Student Work>Pro Tools stuff>Class Interviews.
Intro to Pro Tools - part 2 (Working With Your Audio)

So we've figured out how to get audio into Pro Tools (importing, recording) and we've learned a little bit about how PT's folder structure works. But once you've got the audio in there, how do you start working with it? In other words, what are the "tools" of Pro Tools?
There are 6 basic Edit Tools that let you interact with your media in different ways. They are:
1. Zoomer Tool - Let's you zoom in and out around a particular area within a track.
2. Trim Tool - Lets you adjust the left and right sides of an audio region and quickly get rid of the parts you don't need.
3. Selector Tool - Lets you position the playback cursor or select an area for playback/editing.
4. Grabber Tool - Lets you grab a whole region and move it around.
5. Scrubber Tool - Lets you "scrub", or listen closely to a piece of audio by clicking and dragging the cursor over it. Sounds really cool (like a turntable), but unfortunately you can't record it.
6. Pencil Tool - Lets you get in and redraw the waveform data. You mostly use this to repair little pops and clicks in your file. Important: using the pencil tool is a destructive process!
Now in addition to the 6 basic tools, PT also lets you use what's known as the Smart Tool. The Smart Tool gives you the functions of the Trim, Selector and Grabber tools all at once. You move between these tools by moving the cursor over different parts of the region. In addition to the tools I just listed, the Smart Tool also makes it easy for you to do Fades.
Fades are important for helping to clean up audio because they help you clean out the edges of your audio, where there is a lot of potential for clicks and pops. They also let you seamlessly blend two pieces of audio together by doing what's called a crossfade.
Learning to use these tools efficiently will get you well on your way to
Wednesday, May 21, 2008
Intro to Pro Tools - part 1

Congratulations! You have officially graduated from the World of Reason and are now moving into the Universe of Pro Tools.
So what does Pro Tools do? Basically, it gives you all the main functions of a recording studio on your computer:
- It lets you record
- It lets you edit
- It lets you mix
A software program that can do all of these things (audio and MIDI) is called a Digital Audio Workstation (DAW).
Pro Tools is definitely not the only DAW on the market. Other popular DAWs include Logic, Cubase, Nuendo, Sonar, and others. Pro Tools isn't even necessarily the "best" DAW. Lots of people feel that other programs (e.g. Logic) are actually a lot better for certain things, like recording MIDI.
So why then does everyone seem to be using Pro Tools these days? Probably a number of reasons, including ruthless marketing tactics by Digidesign. Personally, I think that Pro Tools is laid out in a very simple, straight-forward format. It's easy to look at and get around in.
There are actually two main components to any Pro Tools setup: the software and the hardware interface.
The software is where the actual recording/editing/mixing happens.
The interface is just a piece of equipment that lets you get audio into and out of the software. In our classroom we have two different types of interface: the Mbox2 Minis on the student stations, and the Digi 003 on the instructor station. Even though they look really different, they are still performing the same basic function - audio in/audio out.
Important: Pro Tools will not work if it doesn't have a Digidesign interface connected to the computer!
OK, so let's go ahead and open Pro Tools and see what we're dealing with.
To Import your Audio files into Pro Tools:
- Create a new Pro Tools session: Go to File>New Session.
- Name it like this: (song title)_(your name)
- Make sure the song is being saved into My Documents>ADP your folder>Pro Tools Stuff.
- Now go to File>Import>Audio files.
- Find the folder on your hard drive that contains all the audio files you exported from your song in Reason.
- Draw a box around all of them to highlight them.
- Hit Add Files.
- Hit Done.
- You should see a new window pop up asking you to choose a destination folder. If you see the Audio Files folder selected at the top, then go ahead and hit the Use Current Folder button at the bottom of the window.
- Another window will pop up that says "Processing Audio"
- Then another window will pop up, called "Audio Import Options". Make sure "New Track" is selected and hit the Choose Button.
Saturday, May 17, 2008
Exporting Audio from Reason - part 2 (Exporting Individual Tracks)
So, Exporting Songs is fairly straightforward. However, if we want to really work with our beats in a mixing software program like Pro Tools, then we really want to be working with individual tracks, not entire songs.
That means we need to figure out how to get those individual tracks out of Reason. There are a couple different ways to do this, but the most straight forward is to Export the individual audio tracks in exactly the same way that we did the Stereo Mixes. One important difference, though, is that we need to Bypass the Mastering Combinator when we export. We do this because the Mastering Combinator is meant to be working on an entire song, not on just one instrument. Therefore, it's going to do weird things to the track if you just have a single instrument running through it.
To Export Individual Audio Tracks, do this:
- Make sure you have a folder created where you can store all your tracks.
- Bypass the Mastering Suite Combinator.
- Check all the volume levels of your tracks and adjust them as needed.
- Set the E to the end point of your song.
- Solo the individual track you want to work with in the Mixer.
- Go to File>Export Song as Audio File.
- Choose the folder that you are saving your work to.
- Name the file whatever the instrument is. Example: "Drums.wav", "Bass synth.wav", etc.)
- Hit Save.
- Choose your Sample Rate and Bit Depth. Again, unless you have a specific reason, the following are fine:
- Sample Rate: 44,100 Hz
- Bit depth: 16
Exporting Audio from Reason - part 1 (Stereo Mix)
As you start finishing your songs and are happy with the arrangement, the mix, etc., you can start thinking about Exporting your songs as audio files.
What is Exporting, and why do you need to do it?
Well, right now your songs are Reason files (*.rns). They only play back in Reason. You can't burn them to a CD, you can't listen to them in iTunes, you can't upload them to Myspace/imeem/etc. You can only open them on a computer that has Reason on it.
In order for you to do all the things I just mentioned, you need to convert the song into in audio file. Doing this is super simple, but before you do it, you really need to be aware of a couple of things. The main one is that you need to make sure that nothing is clipping.
Clipping is when something is distorting digitally. It happens when the volume of your track(s) is louder than the computer can handle. Usually it is really obvious and sounds like things are crackling in an ugly way. Sometimes, though, you can't immediately hear it, so you don't do anything about it until it's too late. This is now getting to be a special problem in Reason because the Mastering Suite Combinator is hiding the clipping from you.
In general, the way you avoid clipping/distortion is to make sure that none of your tracks' volume levels are getting all the way to the top of the meter. To make a track not clip, simply turn down the volume.
However, if you do turn a track down, pay close attention to what is happening to your overall mix. You may have to adjust the other tracks' volume levels to keep things balanced the way you want.
Once you're happy with the mix and you've checked to make sure there's no clipping going on, you're ready to start exporting.
To Export the whole song as a stereo mix, follow these steps:
- Make any final adjustments to volume levels.
- In the Sequencer Window, make sure the E is set to just past the end of your song. This tells Reason where the end of the song is.
- Go to File>Export Song as Audio File.
- Name the file. For this class, use this format: (song name)_(your name)_(date)
- Choose the location where you want this saved. Please don't take this for granted, or you may never find your file again!
- Hit Save.
- Choose the resolution of your audio. Unless you have a specific reason, for now let's just do:
- Sample rate: 44,100 Hz
- Bit depth: 16
Monday, May 12, 2008
Arrangement - part 1 (Melody)

Today, first we're going to talk a little bit about arrangement.
For our purposes, arrangement is referring to the order and pacing of the parts of a song.
Wikipedia says:
"A satisfactory musical arrangement will most likely (ibid, p.4):
- Provide "contrast between high and low sounds"
- Avoid heavily doubled parts with an emphasis on solo sections
- Be "sufficiently transparent to allow the musical lines to be clearly heard" and
- Not have all the instruments playing throughout."
You could think about a piece of music as telling a story. When you tell a story, you don't just keep saying the same thing over and over again - you try keep the listener wanting to know what's going to happen next, even though you might keep coming back to certain themes.
Now with music, it's a similar concept. You've got to keep things moving forward for the listener. There are lots of different ways you can do this, but in pop music (rock, hip hop, etc.), there is a very specific and consistent formula that is used in building songs. It goes something like this:
INTRO - VERSE - CHORUS - VERSE - CHORUS - BRIDGE - VERSE - CHORUS - OUTRO
So what are all these words and what does the order mean?
- Intro - Beginning of the song that establishes the vibe.
- Verse - The main sections of the song where the "story" is being told. Generally, a lot of the instruments drop out, or are softer in the mix so that you can focus on the vocalist. In a lot of pop music, the Verse is 16 bars long.
- Chorus - aka "The Hook". This is the part of the song that is repeated and is generally the most exciting. It is the part that is easiest for people to remember and sing along to. The Chorus is usually shorter than the Verse, though sometimes you can have a couple of Choruses playing back to back, especially at the end of song. In a lot of pop music, the Chorus is 8 bars long.
- Bridge - A section where the song completely switches up. It sounds different from either the Verse or the Chorus. Generally fairly short: 8 or 16 bars.
- Outro - The end of the song. Some way of making the listener feel like they have come to the end of the story. There are lots of ways to do this, depending on what you are trying to accomplish. Sometimes this is accomplished through a fade out. Sometimes the instruments will drop out and have the vocalist finish his/her line as a statement.
Wednesday, May 7, 2008
{Routing REMIX!}
So now everyone is going to do a remix of someone else's work from the last assignment. Copy the person's Reason file to your computer and immediately do a save as. Call the new file Routing Remix_(your name). You will be finishing this and putting it back on the Media Share folder to share in the next class.
Here are the rules:
Here are the rules:
- You can't change any of the melodies.
- You can add one melodic instrument of your own.
- You can change the arrangement (order of the different parts).
- You can add new drum patterns.
- You can change/add as many FX as you want.
- You can change the tempo of the song.
{Routing Assignment 2}

Last time, we started worked on routing the different instruments and FX in Reason. One of the main things that I had a student demonstrate was the way all the individual channels of the Redrum could be routed to the mixer. This is an important concept because it helps you to gain a greater understanding of the way sound moves around through the program, and in a studio situation.
The basic concept is that every device in Reason has an output. This output is the point where sound is coming out of the device.
 Certain devices, such as FX and mixers, also have inputs, where you can run a signal from somewhere else into the device. When you're connecting two devices together, you are connecting the output of one device to the input of the other through a cable (in Reason, we are using "virtual" cables).
The most basic example of this is when you have an instrument, say a Malstrom, hooked up to the Mixer: you are taking the output of the Malstrom and connecting it to the input of a channel on the Mixer. What is happening when you want to put an effect (say, a Scream) on that instrument?
Keep in mind that while certain instruments have only a mono output (Subtractor), most of the instruments have a stereo output, which allows you to hear differences between the left and right sides of your headphones. What you have to keep in mind, is that to hear a stereo sound, you will have to connect 2 cables from the device to the input of the Mixer channel.
Your assignment is as follows:
1. Find the Reason file called "Routing Exercise" and copy it into your
folder on your hard drive.
(Media Share>Class Materials>Reason Files>Routing Exercise)
2. Open it and save it as "Routing Exercise_your name".
3. Connect the Master Outputs of Mixer 1 (the top one) to the Combi Inputs of the Mastering Suite Combinator.
4. Connect the Combi Outputs of the Mastering Suite Combinator to Outputs 1 & 2 of the Hardware Device. Why is this a weird thing to do?
5. Now connect the output of each individual Redrum channel (1-10) to the input of the first 10 channels of Mixer 1.
6. Make a beat and Insert an FX device on at least one of the drum sounds.
7. Now add at least five more instruments to your song. You will need to connect a second mixer to do this...
8. Connect the Master Outputs of Mixer 2 to the Chaining Master Inputs of Mixer 1.
9. Connect your additional instruments to Mixer 2.
10. Include at least on FX device as an Insert, and one as an Aux Send.
11. Save your song and put a copy on the Media Share folder.
(Media Share>Student Work>Reason Beats>5-7-08>Routing Exercise_your name).
Monday, May 5, 2008
{FX Routing Assignment}
Working as a class we're all going to take some turns putting FX and processors on my beat.
Here's what I want:
Here's what I want:
- All the drums routed to their own tracks.
- A Scream on the Kick Drum (Reason Factory Soundbank>Scream Patches>Warpkicks)
- The same Delay on the snare and Shaker (using the Aux Sends)
- A Unison on the Subtractor.
- Put an Envelope Filter (Bandpass) on the Piano.
- A Phaser on the Malstrom.
- A Chorus/Flanger on the Piano (after the Filter).
- A little RV7000 on everything! (using the Aux Sends)
- An MClass Mastering Suite Combinator on the whole mix (aka after the Mixer).
Effects - part 1

At this point we've explored every instrument in Reason. But the instruments themselves are just starting places in terms of creating and shaping sounds in your music. To help you take your sounds to the next level, Reason has a whole bunch of Effects (aka "FX") that are like virtual versions of equipment you would find in a real recording studio. And, just like the real thing you have the flexibility of setting up your FX in a number of different ways, depending on what you're trying to do. But first let's talk about the kinds of FX that exist.
So far, I've been using the term "FX" in a really general way, but let's make a quick distinction. There are two basic categories of equipment used in audio production. They are:
- Audio Processors (compressors, EQ, filters, distortion, phasers)
- Time-based FX (reverbs, delays, choruses, flangers)
The simple answer is: the way they are traditionally used.
Processors are generally used to process the entire signal. If your signal is going through a filter, the whole thing is getting filtered. You are taking the whole sound and doing something to change it.
Time-based FX, on the other hand, usually blend a combination of the Dry (unprocessed signal) with the Wet (processed) signal. In this case you're using the effect to add something to the signal you've already got.
OK, so let me give a quick demonstration, using the Scream distortion processor and the RV7000 reverb...

You should be aware that in a traditional studio setup, these different types of processors are generally setup in different ways.
Audio Processors are generally placed directly into the signal path of the track. This is called an Insert, because you are Inserting the processor directly into the signal path.
Time-based FX, on the other hand, are generally available through what are called Auxillary Sends (aka Aux Sends). This allows any track running through the mixer to be split off and sent to the FX unit and then be blended back into the overall mix.
So, here's the quick reference for using FX:
- Before creating an FX processor, be sure to click on whatever you want to be putting the processor on (instrument, mixer, etc.)
- Clicking on an instrument will Insert the processor directly into the signal path.
- Clicking on the mixer will make the processor available through an Aux Send on the mixer.
Wednesday, April 30, 2008
Samplers - part 3 (Dr. REX)
 Aright. So we've gotten pretty well into using samplers in Reason, specifically the NN19 and NNXT. We've used them to:
- Play back multisample patches of instruments in Reason.
- Load our own samples and map them to their own keyzones.
- Loop a drum sample.
- Chop up a sample and play the individual drum hits with a keyboard.
TIMESTRETCHING
What is "timestretching"?
Wikipedia:
"Timestretching is the process of changing the speed or duration of an audio signal without affecting its pitch."
This is most useful when you find the perfect sounding sample loop that isn't quite at the right tempo.
Here's an example:
Say you make a song that is at 89 BPMs. Perfect tempo, you can't stop nodding your head when you listen to the song. Then you find this great drum loop that you would be perfect for fitting into the song, but its tempo is 97 BPMs.
Now, you know that by decreasing the pitch, you can make the tempo slower, so you drop the pitch and the drums are now playing exactly in time with the song. BUT, when you listen to it, the drums are all kind of screwed up and psychedelic, and they don't sound anything like the clean drum sample you started with. The kick drum is not thumping, the snare isn't cracking, the hi hats aren't crisp, so there's really no point in using it anymore.
But what if you were able to make the loop fit the song, without changing the pitch? That would change everything, right? Welcome to the wonderful world of timestretching, my friends.
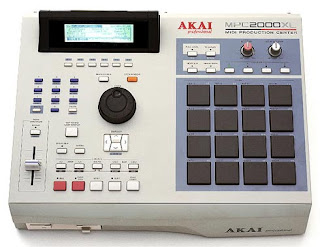
In terms of hip hop history, timestretching first started getting used a lot with the release of the Akai MPC2000XL. That was the first beat machine that incorporated the technology, and it became a pretty standard tool after that. Changed the production game.
Problem: Reason does not do timestretching!
So, why am I even bothering to tell you about it then?
For one thing, most DAWs (Pro Tools, Logic, Cubase, etc.) have a timestretching function, so you should be aware of it for when we get into using Pro Tools. But also, although it doesn't do timestretching per se, Reason does use a similar technology to accomplish a similar thing. In addition to the NN19 and NNXT, Reason has a sample-playback instrument called the Dr. REX.
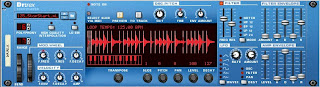 Big difference between the Dr. REX and the other samplers is that while the NN19/NNXT can play back standard audio files (WAV, AIF), the Dr. REX can only playback special files created using another software program called Recycle.
Wikipedia:
"Timestretching is the process of changing the speed or duration of an audio signal without affecting its pitch."
This is most useful when you find the perfect sounding sample loop that isn't quite at the right tempo.
Here's an example:
Say you make a song that is at 89 BPMs. Perfect tempo, you can't stop nodding your head when you listen to the song. Then you find this great drum loop that you would be perfect for fitting into the song, but its tempo is 97 BPMs.
Now, you know that by decreasing the pitch, you can make the tempo slower, so you drop the pitch and the drums are now playing exactly in time with the song. BUT, when you listen to it, the drums are all kind of screwed up and psychedelic, and they don't sound anything like the clean drum sample you started with. The kick drum is not thumping, the snare isn't cracking, the hi hats aren't crisp, so there's really no point in using it anymore.
But what if you were able to make the loop fit the song, without changing the pitch? That would change everything, right? Welcome to the wonderful world of timestretching, my friends.
In terms of hip hop history, timestretching first started getting used a lot with the release of the Akai MPC2000XL. That was the first beat machine that incorporated the technology, and it became a pretty standard tool after that. Changed the production game.

Problem: Reason does not do timestretching!
So, why am I even bothering to tell you about it then?
For one thing, most DAWs (Pro Tools, Logic, Cubase, etc.) have a timestretching function, so you should be aware of it for when we get into using Pro Tools. But also, although it doesn't do timestretching per se, Reason does use a similar technology to accomplish a similar thing. In addition to the NN19 and NNXT, Reason has a sample-playback instrument called the Dr. REX.
 Big difference between the Dr. REX and the other samplers is that while the NN19/NNXT can play back standard audio files (WAV, AIF), the Dr. REX can only playback special files created using another software program called Recycle.
 Recycle (which is made by Propellerhead, the same company that makes Reason) basically allows you to chop an audio file up into slices. The program automatically creates slices at points called attack transients, which are basically the main points where drums or other sounds are hitting. Once you've got the file chopped up into slices, you can load it into the Dr. REX player and it will automatically adjust the sample to whatever tempo the song is set to.
One thing that you should be aware of is that neither timestretching, nor beat slicing is a perfect science. The farther you take a sample away from its original tempo, the less realistic it's going to sound.
That said, let's work check this out:
1. Go into Media Share>Class Materials>Samples and find the file called Funky Drummer_break.rx2. Copy it into your folder on your hard drive. Be sure that you are copying the REX 2 file, not the regular wav file!
2. Create a new song in Reason and create a Dr. REX sample player.
3. Load the Funky Drummer_break sample into the Dr. REX.
4. Play some keys on your keyboard. What do you hear? Does this remind you of anything?
5. Set the tempo to 106 BPMs.
6. Set your loop markers for four bars (L on Bar 1, R on Bar 5)
7. Click on the button that says "To Track". What happens? What does this remind you of?
8. Now drop the tempo down to about 90 BPMs. What's it sounding like now?
9. Find the Transpose knob on the front of the sampler and change the key up to F#.
10. Transpose it back down to C.
11. Set it to a tempo that you like and incorporate it into a song. 24 bars. Use the filters and/or LFO controls.
Monday, April 28, 2008
Samplers- part 2 (loops)

Today we're going to get into using samplers to work with loops. Specifically, we're going to start working with breakbeats.
As we learned earlier, breakbeats were the parts of old school funk and soul records where all the instruments would drop out except for the drums. This is the part of the song where people would really freak out and go off dancing.

Kool Herc figured out that by having two copies of a record, he could extend the breakbeat for as long as he wanted, playing one record, then the other, then rewinding the break on the first record, etc. Some people would say that this was the real start of hip hop as a new, distinct style of music, using the breakbeat as the backbone of the whole genre.
A few years later, when samplers became affordable and had long enough sampling times (see "Samplers - part 1"), people were able to just record the breaks into the samplers and have them loop automatically for however long they wanted.
Today we're going to get into working with a particularly famous break from a song called "The Funky Drummer", by James Brown.
Let's listen to the original for a second...
Funky Drummer
So now we're going to work on getting the break into our own songs so that we can use it.
But first...
Disclaimer: Sampling other peoples' work without their permission is a violation of copyright laws. If you are merely sampling for your own educational purposes (like we are doing in this class), then you should be fine. BUT if you intend to create and SELL music that incorporates samples of other artists' work, you are legally required to get all necessary permissions from the owners for the use of those samples. Think about it...how would you feel about someone taking your music without your permission and then making money off it?
That said, check it out...
1. First, let's grab the sample you're going to be working with and copy it to your hard drive. Go to Media Share>Class Materials>Samples and find the file called "Funky Drummer_break.wav". Copy that into your folder on your hard drive.
2. Now create a new Reason song called "Breakbeat lesson 1_your name".
3. Create an NN19 sampler in your rack and make sure it is connected to a Mixer 14:2. 4. Click on the Browse Sample button at the top of the NN19.
5. Load the Funky Drummer_break file into the sampler.
6. Play some notes on your Oxygen 8 keyboard and find the key that plays the loop in its original pitch.
7. So what we've got here is a 1-bar drum break. In order to make it line up with everything else in your song, we've got to make the tempo of the song fit with the tempo of the break, so...first, set your L and R markers so that they are marking off a single measure (put the L on bar 1 and R on bar 2).
8. Now hit Shift-Tab on your keyboard to go into the Edit View of your NN19 sequencer track (the part that shows the keyboard and notes).
9. Click on the Pencil Tool.
10. Find key C3 and draw a note that is exactly one bar long.
11. Make sure the Loop On/Off button is lit up, then hit play and listen to the loop. What is happening?
12. Now let's adjust the tempo so that the sample loops perfectly...Lower the tempo until you get down to 101 BPMs. Sounds good, right?
13. OK, so now we've got something that we can work with.
14. Switch over to the Arrange View (hit Shift-Tab).
15. Now we're going to mark this sample loop into a group. Using the Pencil Tool, mark off 1-bar. You should now have a region that you can copy and paste as many times as you want in the song.
From here, you can go ahead and create a Redrum drum machine and start making a beat that can either go over the loop, or switch off parts with it. You might also want to try playing with the Filters on the NN19 and seeing how you can switch up the sound of the loop.
Your assignment:
Create a 24-Bar song that incorporates both the drum break and the your own original Redrum drum pattern. Here's the catch: the loop has to be played back at a pitch other than its original pitch, meaning a key other than C3. So you will probably have to adjust the tempo to make this work.
Hint: When you're trying to match the tempo, if you hear the loop getting cut off too soon, then the tempo is too fast. If you hear a gap at the end of the loop before it starts playing again, then the tempo is too slow.
Saturday, April 26, 2008
{Multisample Lesson}

Now we are going to do a lesson where we load samples of our own voices into the NN19.
1. Record two vocal samples into Pro Tools (the instructor will help you with this).
2. Load your samples into the Media Share folder and copy files into your folder on your computer
3. Open Reason and create a new song.
4. Create a NN19 Sampler
5. In the screen of the NN19 right click and select 'Split Key Zone'.
6. Click on the Key Zone on the left side and click the browse sample button
7. Load one of you two samples
8. Now click on the Key Zone on the right side of your NN19 screen and click the Browse Sample button.
9. Play some of the keys on your keyboard and notice where the pitch changes are happening.
10. Now lets change the key where the sample on the right plays its original pitch.
11. Find the knob called Root Key (under the NN19 screen).
12. Turn the knob until the root key is C4.
13. Your two samples should now play in their original pitches on Keys C3 and C4.
14. Make a beat that incorporates your samples.
Wednesday, April 23, 2008
Samplers - part 1

So, we've covered synthesizers and worked with each of the different synths in Reason. Now besides synths, there is a second category of instrument that you have probably already experimented with: the sampler.
"What's a sampler," you ask?
Better question: what's a sample?
There are actually two different definitions, depending on who you're talking to. You need to know both:
1. (common definition) A piece of a sound recording that is taken and incorporated into a new musical composition.
2. (technical definition) The smallest unit of a digital audio recording.
Let me just deal with the second one, briefly, because this is at the heart of understanding digital audio. We'll get deeper into this when we start working with Pro Tools and recording stuff.
OK, so we know that sound is really the vibration of air molecules, and that it moves in waves, right? So, when you've got sound going into a device like a microphone (aka a transducer), what's happening is that that sound wave is being converted into an electrical signal that has all the same properties (frequency and amplitude!) as the wave that was traveling in the air. This is called analog audio, because the electric wave is analogous to the sound wave in the air. Stay with me for a minute...
So, when you're talking about an analog audio recording, you're really talking about an actual physical representation of a sound wave that exists in one form or another. With digital audio on the other hand, what's happening is a computer is taking tons of tiny snapshots of the sound wave, and storing that information as a zeros and ones. The waveform doesn't physically exist anywhere, there's just a bunch of computer datat that describes what the wave is supposed to look and sound like. Don't stress about this, we'll get into this later, right now, just understand this:
The smallest snapshot that a computer takes of a sound wave is called a sample.
So, when you're listening to any kind of digital audio (MP3, CD, etc.), what you're actually listening to is one big, long series of these samples. "How many samples, you ask?" Well, I'm glad you asked! It depends on what format you're talking about, but...
CD quality audio samples at a rate of 44.1 kHz
Or,
44,100 samples per second.
Or,
44,100 samples per second.
Basically, the higher the sample rate, the better the quality of your audio. Most professional recording is done at 48 kHz or 96 kHz.
So we know what a sample is. Getting back to the original question then, what is a sampler? Wikipedia says:
A sampler is an electronic music instrument closely related to a synthesizer. Instead of generating sounds from scratch, however, a sampler starts with multiple recordings (or “samples”) of different sounds, and then plays each back based on how the instrument is configured.
So, a sampler is basically an instrument that can play back digital audio recordings (aka "samples").
Here's a quick and dirty history of hardware samplers:
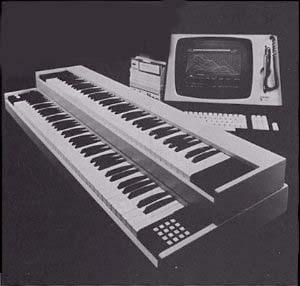
Synclavier

Fairlight CMI
So, from a hip hop/electronic music perspective, the sampler was a huge breakthrough because it allowed you to capture a drum break (or other sound) and then loop it, creating an infinite beat. (We'll get into this more in the next lesson).
But loops weren't the only thing samplers were good for.
Think about it, you have a machine that can take a recording of ANY sound and then play it back. That's cool, but what's really amazing is that you could actually hook up a tool like a keyboard to a sampler and then play the sample back, at all the different pitches of the keyboard. So, you could take a sample of a real instrument (say, a saxophone), or even a completely random sound, and then play it like a piano.
Only, it's never quite that simple...
See, the problem is, most samplers do know how to adjust the pitch of a sample so that it plays the correct pitches on all the keys of the keyboard, BUT the farther a sample gets away from its original pitch, the less it sounds like a real instrument.
Let's see for ourselves, using Reason's NN19 sampler:
Really good quality multisamples are especially important when you're trying to realistically recreate things like orchestral instruments, which have highly detailed sounds and are easy to tell when they are off.
So...your assignment right now is to find some good orchestral patches and use them in a song.
Please make me a song that meets ALL of the following requirements:
A sampler is an electronic music instrument closely related to a synthesizer. Instead of generating sounds from scratch, however, a sampler starts with multiple recordings (or “samples”) of different sounds, and then plays each back based on how the instrument is configured.
So, a sampler is basically an instrument that can play back digital audio recordings (aka "samples").
Here's a quick and dirty history of hardware samplers:
Synclavier

- Came out in 1975
- Cost $200-300k

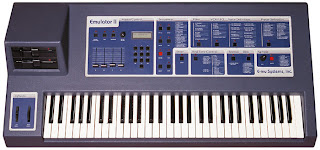
- Came out in 1983
- Cost about $25,000
- Supposedly Took 2 hours to boot up
- Featured basic MIDI capability
- Used by Herbie Hancock ("Rockit") and Kurtis Blow ("If I Ruled the World")

- Came out in 1984
- Cost $8,000 - 10,000
- Had an option to add a hard drive

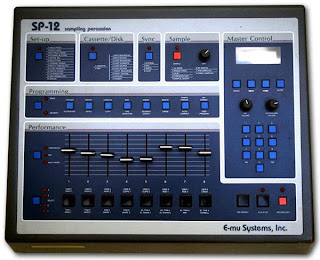
- Came out in 1985
- Had 24 onboard drum sounds
- Featured 1.2 seconds of sample time
- Had MIDI sequencing, which allowed you to create whole songs
- One of the original hip hop production tools - classic gritty sound
- Replaced by the SP-1200 (10 sec. sample time)

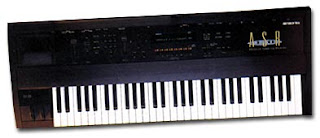
- Came out in 1988
- 13.1 sec of sample time (upgradable to 26.2)
- 16 velocity sensitive pads
- 40 kHz sample rate
- Gave birth to the whole MPC family (2000/3000/2000XL), which became the standard hip hop production tools throughout the 90s.
- Used by DJ Shadow on Endtroducing - the first album created only with samples.

- Came out in 1992
- Up to 44.1 kHz sample rate (CD quality!)
- featured lots of onboard FX and sound processing
- Not as popular as Akai MPCs, but it's still widely used by producers for its unique sound (Timbaland, Neptunes, Kanye).
So, from a hip hop/electronic music perspective, the sampler was a huge breakthrough because it allowed you to capture a drum break (or other sound) and then loop it, creating an infinite beat. (We'll get into this more in the next lesson).
But loops weren't the only thing samplers were good for.
Think about it, you have a machine that can take a recording of ANY sound and then play it back. That's cool, but what's really amazing is that you could actually hook up a tool like a keyboard to a sampler and then play the sample back, at all the different pitches of the keyboard. So, you could take a sample of a real instrument (say, a saxophone), or even a completely random sound, and then play it like a piano.
Only, it's never quite that simple...
See, the problem is, most samplers do know how to adjust the pitch of a sample so that it plays the correct pitches on all the keys of the keyboard, BUT the farther a sample gets away from its original pitch, the less it sounds like a real instrument.
Let's see for ourselves, using Reason's NN19 sampler:

- Open Reason, create a new song, save it as "Multisample demo"
- Make sure there is a Mixer 14:2 in your rack
- Create an NN19 sampler
- Right click on the Browse Patch button and click on Initialize Patch.
- Now click on the Browse Sample button
- Go to Reason Factory Sound Bank>NN19 Patches>Piano>Bright Piano>PianoBC3.wav and click OK to load that audio file.
- Play C3 (the first white key on the left side of the keyboard) and listen to how it sounds.
- Now play C4 (one octave up from C3). How does that sound?
- Now hit the Octave Down button on your keyboard and play the low C key again. How does it sound?
- For this one, click on the Browse Patch button.
- Go to Reason Factory Sound Bank>NN19 Patches>Piano>BRIGHTPIANO.smp and click OK.
- Now play the same notes that you did a minute ago. How do they sound different?
Really good quality multisamples are especially important when you're trying to realistically recreate things like orchestral instruments, which have highly detailed sounds and are easy to tell when they are off.
So...your assignment right now is to find some good orchestral patches and use them in a song.
Please make me a song that meets ALL of the following requirements:
- The song must be at least 24 bars long.
- You may only use 1 Redrum and as many NN19s as you want. NO OTHER INSTRUMENTS!
- 1 of the NN19s must be some kind of Strings
- 1 of the NN19s must be some kind of Brass
- 1 of the NN19s must be some kind of Woodwinds
Subscribe to:
Comments (Atom)
